
For this How-To we’re going to replace the clutch friction discs in a 1969 Honda CL450, but this procedure would work for CB450s too, and is similar on the 350s. We undertook this project because the motorcycle had been stored so long that the petcock leaked gasoline into the sump, and after fixing that problem the clutch slips. You will need clutch plates and possibly clutch springs, though those are rarely bad. A new gasket for the right side case would be useful, and a new seal for the kickstart shaft, if needed. If the oil sump plug O-ring is flat you’ll need to replace it too. Dime City Cycles will have some or all of these parts. You’ll need oil of the correct weight and amount also, in this case 1.8 liters of 10w40. A good set of metric sockets and wrenches, particularly 10, 12, 14, 17 and 19mm sizes. Start by draining the oil through the sump plug on the bottom of the engine. You’ll need a 19mm wrench, preferably a socket. Most of the sump plugs have been mangled over the years from people using SAE or adjustable wrenches in the place of metric. They also suffer from overtightening.– Keith Fellenstein

1. Using needle-nose pliers, remove the spring that actuates the rear brake light switch. This spring looks suspiciously like something found in the previous owner’s junk drawer, but it works.

2. Slacken off the brake adjuster nut at the rear wheel. A deep 14mm socket works to get it started, but you should be able to remove it by hand once the spring tension is reduced.

3. Remove the right footpeg. One bolt is the lower motor mount stud and the other is a through bolt. You’ll need a 14mm wrench and a 17mm wrench for this step.

4. Prop the brake lever down against its spring using a suitable flat piece. We used a wood scrap, but a metal piece would work too. You’ll need it out of the way to easily remove the right engine cover.

5. Remove the 12mm bolt holding the kickstarter and carefully lever off the kickstarter. The seal was worn out and will be replaced. It’s a 17 x 20 x 7 available from many sources, including Dime City.

6. Remove the screws holding the right case cover. There are two different lengths of screw, the longer ones are for the two case holes with hollow dowels.
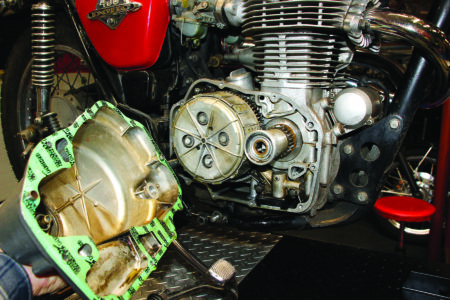
7. With a rubber mallet, tap around the case until the gasket breaks free and remove the right-side engine cover. You will have a small oil spill even though you already drained the sump, so be prepared. If you’re lucky, you can reuse the case gasket, but best practice is to use a new one.

8. With the cover removed you can pry out the old kickstart seal; ours was so brittle it came out in two pieces.

9. Clean out the seal cavity with brake cleaner and a rag to remove any oil that has leaked in. Put the new seal squarely in place in the opening of the case.

10. We used a scrap of nylon as a backing plate to apply even pressure to the seal, then pressed it in place with the palm of my hand. I tapped it home the final millimeter or so with an appropriately sized socket and rubber mallet.
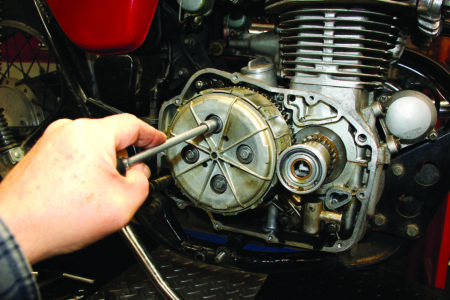
11. Moving back to the clutch. Using a 10mm socket (assuming you can find one), back off the clutch spring bolts. Do them evenly until you have released most of the spring pressure, then remove them completely.

12. Remove the springs, then pull the pressure plate off of the clutch pack. See anything odd about the clutch?

13. Pull the clutch pack, steel plates and friction plates out as a unit. Separate the friction plates and the steel plates and inspect the steel plates for bluing and warping. Replace any that show either sign.

14. Here’s something unexpected, a de-laminated friction plate. Perhaps sitting in a bath of oil and gasoline as this one did had bad effects.

15. Briefly dip the new friction plates in oil. Soaking them for long isn’t necessary, you’re just trying to get a thin film on the surface.

16.Start to reassemble the clutch pack one plate at a time. We start with the special metal plate that nests in the bottom of the basket, followed by alternating friction and plain plates until we have a complete stack.

17. Place the pressure plate over the stack, making sure it completely engages the stack. On this bike it would be possible to install it incorrectly and never pressurize the clutch pack. This first photo shows the pressure plate in the wrong position.

18. Here’s the correct position, 90 degrees rotated from the first photo. Notice the pressure plate comes in contact with the clutch pack.

19. Place the clutch springs in their places and start the screws that bolt them in place. Snug the 10mm bolts down. They’re small bolts so don’t overtorque them. A short handled 1/4-inch socket wrench will remind you to take it easy.

20. Before replacing the right side engine cover, wrap electrical tape around the kickstarter shaft to prevent the splines from nicking the new kickstart shaft seal.

21. Push the engine case back into position, making sure the dowels are in place and seated. Remove the tape protecting the kickstart shaft seal.

22. Reinstall the screws that hold the case in place, remembering where the two longer screws go. Reattach the footpeg, brake switch spring and brake control rod.

23. With the cover back on, refill the crankcase with the proper weight and amount of oil.

24. There are a few more steps to complete the job, these are not strictly necessary but are good practice since you’re already working on the clutch. First slacken the clutch cable at the handlebar adjuster.

25. Next, loosen the locknut at the cable adjuster just outside the left cover over the clutch release mechanism. Turn the cable adjuster to provide more slack in the cable again.

26. With a 10mm wrench, unlock the large slotted adjuster that tensions the clutch pushrod.
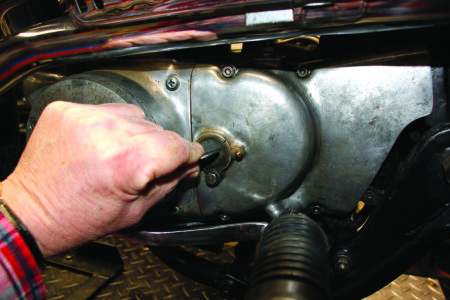
27. Using a suitable tool, screwdriver, or as here, a washer that fits the slot, turn the adjuster clockwise until you feel it stop.
28. You have now taken all the play out of the clutch pushrod. Since we don’t really want any pressure on the pushrod unless we are pulling in the clutch, turn the adjuster back a small distance counterclockwise and relock the adjuster with the 10mm bolt.

29. Take most of the slack out of the cable using the adjuster we loosened in step 25. Tighten the 12mm nut and lock that adjuster.

30. Final adjustment of slack is at the handlebar control. Up to 1/4 inch of play is about right. Now go out and ride, checking to make sure the clutch releases and engages as you want it to.


